These faux embossed Cricut gift boxes make great teacher gifts when you fill them with a teachers two favorite things – chocolate and a gift card to their favorite coffee (or tea) joint.

Have you ever started a project with a specific vision in mind, and had it do a complete 180 but fall in love with the final version even more than the original?
That’s how these metallic faux embossed Cricut gift boxes came to be.
Cricut Gift Boxes – The Back Story
You see, I set out to highlight Cricut’s awesome cuttable papers (the foil, and sparkle/shimmer versions are my all time faves) and the versatility you have with just one box and some fonts. That was the goal. However, I really wanted to write text on the box, but the Cricut pens wouldn’t write on these specialty papers. The ink just smudged right off. I didn’t want to do two layers of cardstock, or vinyl, or anything else, because I wanted to keep the material list short, and I wanted the final product to be very sleek and modern.

So what was a girl to do? I cut a plain box and was hoping inspiration would hit. And it did! As I cut the first box and I watched the Maker (you can also make these boxes on your Explore) score the lines for the box, I had a eureka moment. How would it look if I scored the text I was trying to write?

You guys! I don’t know if I’ve invented a new technique (I honestly feel a little like a scientist right now, discovering a new species) or if I have been living under a rock in Cricut land, but the results are stunning. Look at the embossed texture that scoring the foil poster board creates.

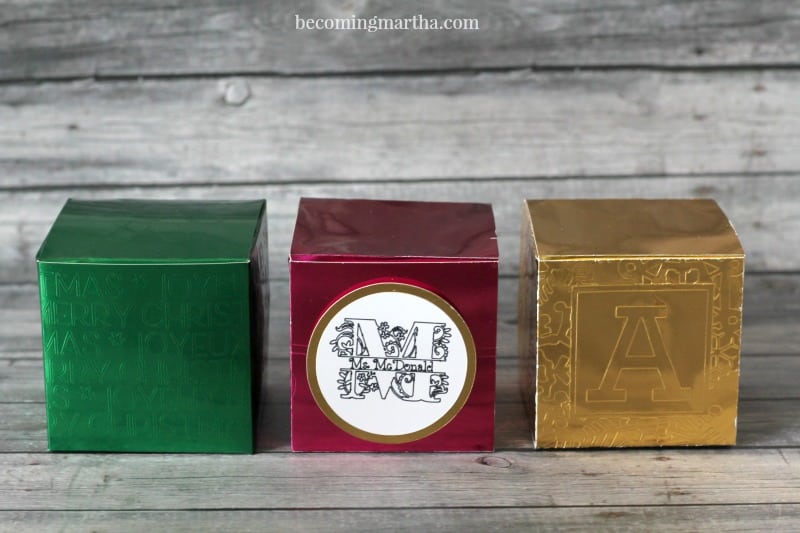
So, instead of showcasing three different papers, I decided to showcase three different styles using the same technique. These boxes are completely customizable. This is just three ideas that I came up with while playing around.
Cricut Gift Boxes – Materials
If you want to create these adorable little gift boxes with your Maker or Explore machine, here’s what you’ll need (I’ve include direct affiliate links to make shopping for materials and tools easy):
- Cricut metallic foil poster board
- double sided tape
- Cricut scoring wheel or stylus (this was created using the stylus, so both will work)
- Cricut Maker or Explore machine (using standard fine tip blade)
- scissors
- Cricut printable sticker paper (optional, for box style 2)
Cricut Gift Boxes – Designs and Styles

I walk through each of the styles in detail in the posts below, but the process used is similar in each. If you want to use my Design Space files (you can edit them to personalize), I’ve included that link below as well. I used gift box design #33910 (Square Box) for all three styles. You can type the design number in the image search to pull it up. I resized it to 11.5″ wide for all.
Cricut Gift Boxes – Style 1 (green with wraparound text)
Instructions / Design Space File
Cricut Gift Boxes – Style 2 (purple with monogram and lights)
Instructions / Design Space File
Cricut Gift Boxes – Style 3 (gold with snowflakes and monogram)
Instructions / Design Space File
*Just a reminder that if you use the Design Space links, you may have to unattach or ungroup elements before you can personalize.

These bad boys may look small, but they can easily fit a full bag of lindt chocolates plus a gift card! Other gift ideas include a Christmas stovetop potpourri or cookies (would also work for neighbour gifts)! You could even package these up for your daughters tween and teen aged female friends with mini manicure kits, or fill with mini size make up products!
Cricut Gift Boxes – Working with Fonts
One thing to mention before you create your box is how to choose a good font. Sometimes Cricut users are disappointed because their fonts don’t turn out the way the expect once they are written (scoring the text will have the same effect as using a pen, just it will be an etched line instead of ink).
Here’s a quick run down of how Cricut reads, cut, and writes fonts:
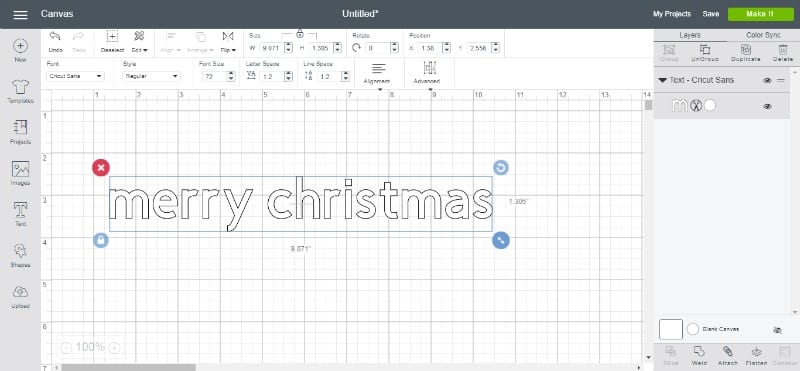
When you add text to an image, the software reads those lines as cut lines. This is ideal when cutting an image, because you need to have space between the cut lines. However, when writing, it will read the same lines and just use a pen instead of a blade. So you will have an outlined text – think bubble text that you used to draw when you were 10. It won’t color in the text. In the image above, the pen would draw along those black lines.
Think about how you use a pencil. If you make a t, you create a single line down and a single line across. If the cricut read those cut lines, you wouldn’t end up with a cut out t. You would end up with a piece of paper with two slice marks in it. It needs to outline a t in order to cut it out.
Cricut Gift Boxes – The Font Solution
But wait – if you want a text that will look like it was written instead of outline, there is a way! In the fonts menu, choose filter, and choose “writing”. This will give you thinner fonts that are better for use with the pen. They will create a single line, like you would if you were writing with a pen. Make sense?
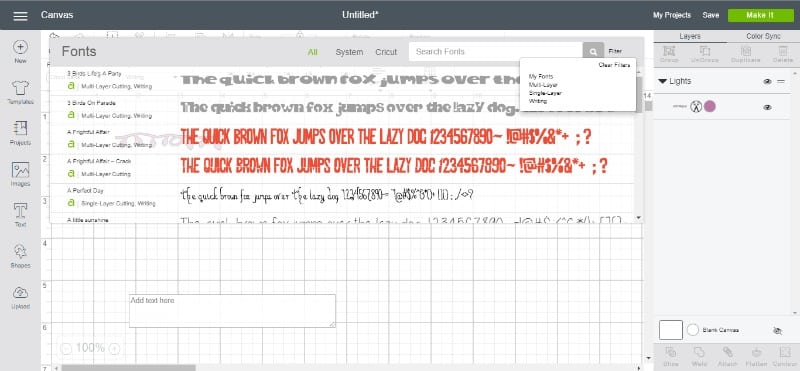
So to recap – if you want your text to be an outline, choose a regular font from the filter menu. To create a look of written text, choose writing from the filter menu. Some fonts, like Cricut Sans, shown below, actually have multiple versions – if you click the drop down next to the name, you will see regular, bold, etc, but also a writing version. The top text in the image below is the regular cut version and the bottom text is the writing version.

That’s one of the benefits of using Cricut fonts – the writing version isn’t usually an option in uploaded fonts.
I think that’s all of the info you need to know. It may seem like a lot at first, but trust me – it’s easy once you do it once. The only techniques we really use are slicing and working with the fonts. Once you use the slice technique once or twice, you’ll get the hang of it pretty quickly.
Now it’s your turn – what do you think of this faux embossing/etching technique? Have you ever tried it, or will you try it? As always, I love to see what you create. Tag me on instagram – I’m @simplycraftedlife. Seeing what you create inspires me even more, so please share! And don’t forget to enter below for your chance to win a Cricut Maker!
This is a sponsored conversation written by me on behalf of Cricut. The opinions and text are all mine.
Crystal-Marie says
So pretty!
Michele Austin says
Thank you Sarah! I’m a new Cricut user and there is so much to learn but I’m loving every minute. The light bulb went on when you explained how the Cricut reads the files for cutting vs. writing. Such a simple thing but sometimes you can’t see the forest for the trees. The embossed boxes are beautiful.
Patt says
Do you put the stylist in the blade holder?
Sarah says
No, in the accessory holder (where pens go!)
joann volz says
Hello Sarah, I just signed up to receive your newsletter, yah! I seen on you tube video where you can emboss on leather, but a bit complex steps for me, are you familiar with any one doing this? Thank you
Linda says
Thank you so much for posting this. It’s prompted me to try my own version. The new screen layout now gives you the option to change anything to score! I make shadow boxes and have been desperate to put larger backgrounds in that looks embossed. My sizzix obviously only goes to a certain size and I was needing at least 23cm x 23cm. Hey presto you can now!