Need easy Halloween party ideas? Using your Cricut, whip up all five of these projects for a party in under one hour!

This post contains affiliate links.
For my Cricut Halloween post, I decided to challenge myself – could I make five easy Halloween party projects using my Cricut Maker in under one hour? Here’s how it unfolded.
First of all, I made the designs in Design Space and didn’t include the designing time in my one hour. Why? Well, I am making all of my files available to you, so you won’t have to count that time either! Also, I created my party for five guests. If you have more guests, you will likely need to cut more projects and it will take a little more time.

Ready to get started? Grab your materials and let’s do this!
Easy Halloween Party Ideas in Under 1 Hour – Stage 1
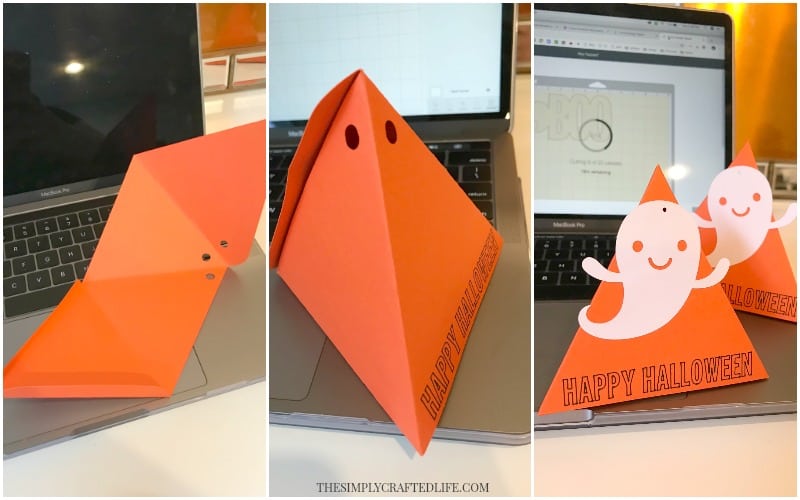
1.BOO TREAT BOXES
Materials:orange cardstock, printable sticker paper (or white cardstock and tape or glue)
Blade/Tools: Cricut pen in black, scoring wheel (or scoring stylus), fine tip blade
Design Space Project: Boo Treat Boxes for Easy Halloween Party
The first project I cut was the treat boxes. I did this one first because it was the only scoring wheel and pen project. I used 12×24 paper to save time changing mats, and cut five orange treat boxes. (Start with the scoring wheel and pen in your A and B clamps, then remove and place the fine tip blade back in.) After, I cut five white ghosts from printable sticker paper, also using the fine tip blade. (Tip: rather than copy and paste the image 5x or 8x, etc, just hit Make It and enter the number of projects in the top left corner and hit Apply. The cut will generate the number of pieces you need!)
2. BOO BANNER

Materials: orange cardstock, black cardstock, printable sticker paper (or white cardstock), double sided tape or glue
Blade: fine tip blade
Design Space Project: Boo Banner for Easy Halloween Party
The second project was the banner. Again, I used 12×24 orange cardstock, which accomodated all five of my pennants. I cut this layer first with the fine tip blade, and while it was cutting, I prepared a mat with black cardstock (the top of the BOO letters) and white sticker paper (the outline for BOO and the two ghosts). I cut those layers next, both using the fine tip blade as well.
3. BOO Y’ALL SIGN

Materials: orange foil paper, black window cling, white window cling, picture frame
Blade: fine tip blade
Design Space Project: Boo Y’all Sign for Easy Halloween Party
For the next project, place orange paper (or patterned Halloween paper) inside a picture frame. For the text, I used the font Street Sign because it has an offset layer. (It actually has three layers, but I deleted the one that appears in purple.) I set the offset layer to white and the forefront layer to black, then sized it to 6″ wide. Lastly, cut them from window cling using the fine tip blade.
4. BOO CAKE TOPPER

Materials: black cardstock, orange vinyl, white vinyl (cardstock and glue will also work in place of vinyl), paper straws or skewers, chipboard (optional)
Blade: fine tip blade and knife blade (if using chipboard)
Design Space Project: Boo Cake Topper for Easy Halloween Party
To start, hide the beige layer that is meant to be the chipboard layer. Since this cut will take a long time, we will come back and cut this last, so that we can assemble our other projects while it cuts. From black cardstock, cut the black welded layer, and cut the orange and white layers from vinyl. (Cardstock also works, I just think vinyl is easier and smoother for something like a cake topper.) Leave this window open, but open a new tab and start project five once your vinyl and cardstock have finished cutting.
5. BOO NAPKIN RINGS

Materials: orange felt (cardstock or craft foam will work as well), white cardstock, hot glue
Blade: fine tip blade and rotary blade
Design Space Project: Boo Napkin Rings for Easy Halloween Party
If you are using felt (or foam that requires the knife blade), hide the orange portion of this project for now using the eye icon in the layers panel. Hit Make it, input your number of projects (for me, it was 5), and hit Apply. Cut the white ghosts out of white cardstock, and if using cardstock for the wrap portion, cut those as well. If your wrap was hid, return to your canvas, and hide the ghosts but unhide the wrap.
Change your blade to the rotary blade for felt or knife blade for craft foam, and hit Make It again, remembering to set your project to 5 (or however many you are making).
OPTIONAL:
Return to the cake topper window to cut the chipboard layer. Insert the knife blade, and tape your chipboard to a strong grip purple mat using a law tack tape. Have the chipboard layer cut while you assemble (the cut will take about 25 minutes.)
Let’s have a time check in… after all of our cuts (except the chipboard layer) were completed in…

I have to say, even I was pretty impressed! Now it was time to assemble though. Could I finish in half an hour?
Easy Halloween Party Ideas in Under 1 Hour – Stage 2
Let’s take a quick look at how to assemble each of these projects:
1. BOO TREAT BOXES: These were the most time intensive of the bunch, but weren’t difficult Fold on the scored lines, place double sided tape or glue on the tabs, and fold inward. Tie a string through the top holes and place a white sticker ghost on top.
Time: 14 minutes.
2. BOO BANNER: Use double sided tape to stick the black letters on top of the white ones. Stick one letter on each pennant, and place one ghost on each of the last two pennants. String twine through the holes at the top of the banner pennants. Time: 3 minutes.

3. BOO Y’ALL SIGN: Place the white window cling on the frame, and layer the black cling on top. If you didn’t do so earlier, place orange paper inside your picture frame. Time: 4 minutes.
4. BOO NAPKIN RINGS: Roll a napkin and wrap the orange felt around, sliding the slots together. Use a dab of hot glue to stick the ghost over the circle. Time: 5 minutes.
5. BOO CAKE TOPPER: The chipboard should be cut now, so remove from the machine. Using glue or tape, stick the black layer on top of the chipboard. Layer the orange vinyl next, and the white vinyl last. Attach to two skewers or paper straws using hot glue. Time: 4 minutes.
PHEW!
You Completed all five Easy Halloween Party Projects!
Take a breath, you are done. For me, I came in just seconds under the one hour mark! But still – to put together five coordinating party projects in under one hour? That’s pretty impressive. There is no way I could’ve done it without my Cricut Maker – the rotary blade for my felt and the knife blade for the chipboard were perfect. However, if you use cardstock instead of those few things, and use the scoring stylus instead of the scoring wheel, you can still pull these projects off with a Cricut Explore.

Which project was your favorite? I love working with the window cling – it often gets overlooked, but don’t forget about this product! You can use it on frames, mirrors, windows, cups, plates, you name it. So what are you waiting for, go get started, and you’ll be ready to party in under an hour!
Easy Halloween Party Ideas Using Cricut
This is a sponsored conversation written by me on behalf of Cricut. The opinions and text are all mine.
Shirl says
Very impressive and completely adorable!